Getting over the initial hump with AutoLISP
Up to now, Python has been my only programming language. Now there's AutoLisp. Once I discovered LISP routines in AutoCAD, I wanted to learn how to write and debug them. Until recently, there was no practical tangible reason for me to do that, so I didn't. Now that has changed, and I can't say I'm unhappy about it.
So I've set about getting over the hump that seems to always stand between me and a progressing cogitive chain. The first link always seem to be the hardest to forge. Once its ends are joined, though, subsequent links seem to come with increasing rapidity, which brings me joy.
I want to share that joy with anyone who might get some benefit, so I'm planning to document my progress as I go. The act of documenting helps my learning, and provides me with notes to look back on. Plus maybe someone else can glean some insight from this work.
I'm going to start by selecting two points in model space, and then instruct AutoCAD to draw a rectangle using those points. Let's get started, shall we?
AutoLISP is made for AutoCAD
To understand AutoLISP, one has to have some understanding of AutoCAD. Like, for instance, points are not a single entity, but are made up of three numbers, each representing either x, y or z.
In spite of the fact we work in 2D most of the time, AutoCAD is a 3D modeling tool. (Albeit a rudimentary one.)
The "x" number represents a horizontal left/right distance from "THE POINT OF ORIGIN", which is numbered (0,0,0). 0 on the x axis, 0 on the y axis, and 0 on the z axis. Positive "x" numbers move to the right, negative "x" numbers move to the left of 0.
The "y" number represents what might be thought of as the "depth" measure away from the point of origin to the distant horizon in front of you. Positive numbers move forward away from you (the point of origin), negative numbers move past you to your rear.
The "z" number represents what might be thought of as the height measurement away from the point of origin. Positive numbers are up, negative numbers are down.
Starting Simple
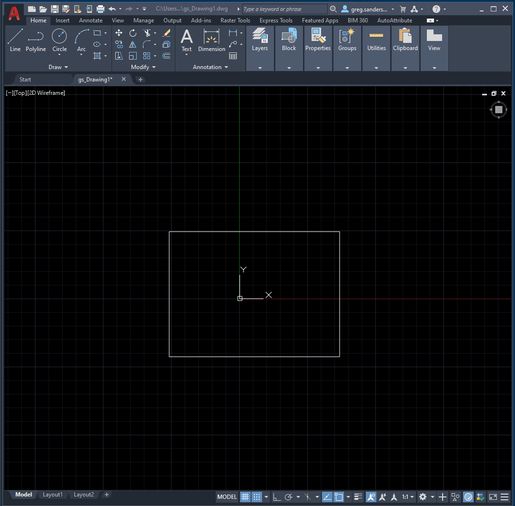
 Image: This may look simple, but it takes some work to get there.
The above screenshot shows the end result of the LISP routine listed below. You might be inclined to think "y" is pointed up. That's normal.
You need to think of this 2D image as being a picnic blanket lying on the ground. You are standing above it looking down. "x" goes left and right, "y" heads off to the far horizon in front and behind you. Get it? Good.
A Few Comments About Lisp
In the code block below, you'll likely notice a couple of things. There are a lot of parentheses. There are a lot of semicolons.
- LISP is an ancient language, developed starting in 1958. It has many legacy wierdnesses.
- In LISP, everything is contained between an opening parenthesis, and a closing parenthesis. Every function, every expression, every list. It's a lot to keep up with.
- In LISP, semicolons mark comments. Everything on a line following a semicolon is for the human reader (you). The LISP interpreter ignores it.
- In LISP, spaces are used as value delimiters. This is weird coming from Python where commas are the delimiters.
This codeblock (below) is a complete AutoLisp program. If you load it into a running instance of AutoCAD and issue the command WORKWITHLISTS, you will be prompted to click first on one corner then the other to make a rectangle (window selection) with the cursor. When you finish, AutoCAD will draw lines creating the same rectangle on the screen.
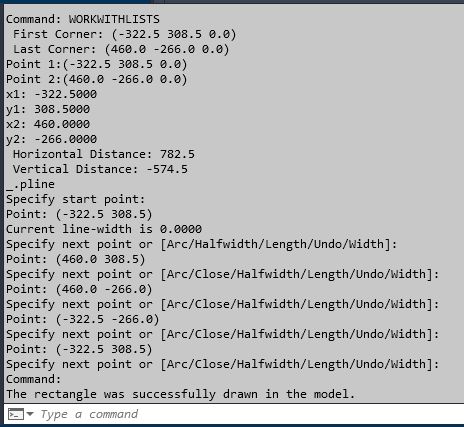
More important, you will get this printout on the console:
 Image: If you code it right, the console can help you learn this stuff.
And Now . . . the Code
;; WORKING_lists_car_cadr.lsp
;; Gregory A Sanders - Fall, 2022
;; A few fundamentals of working with lists.
;; This uses:
;;      defun
;;      setq
;;      getpoint
;;      getcorner
;;      car
;;      cadr
;;      print
;;      "\n" - (new line)
;;      princ
;;      strcat
;;      rtos
;;      foreach
;;      command
;;      vl-princ-to-string
;;
;; Select a rectangle on the screen, then draw lines based on those coordinates.
;;
(defun c:workwithlists( / pt1 pt2 x1 y1 x2 y2 hor1 ver1 selectedRectangle)   ;define the program, make it runnable (c:), make all variables local variables.
  (setq pt1 (getpoint "\n First Corner: "))               ;Prompt for the first point. Points are x y z coordinates saved to a list type variable.
      (princ pt1)                                         ;Using (princ) immediately prints the contents of pt1 to the console with no new line.
  (setq pt2 (getcorner pt1 "\n Last Corner: "))           ;Prompt for the opposite corner of the rectangle in model space.
      (princ pt2)                                         ;Using (princ) immediately prints the contents of pt2 with no new line.
  (princ (strcat "\nPoint 1:" (vl-princ-to-string pt1)))  ;(strcat "a" "b") concatenates the space-delimited strings into a single string. "\n" causes a new line.
  (princ (strcat "\nPoint 2:" (vl-princ-to-string pt2)))  ;(vl-princ-to-string pt1) transfoms the list into a string.  "\n" causes a new line.
  (setq x1 (car pt1))                                     ;Get x coordinate of pt1.  "car" returns the first value of the list.
      (princ (strcat "\nx1: " (rtos x1)))                 ;(rtos x1) converts the real number contained in variable x1 to a string.
  (setq y1 (cadr pt1))                                    ;Get y coordinate of pt1.  "cadr" returns the second value of the list.
      (princ (strcat "\ny1: " (rtos y1)))                 ;Print y of pt1.
  (setq x2 (car pt2))                                     ;Get the x coordinate of pt2.
      (princ (strcat "\nx2: " (rtos x2)))                 ;Print x of pt2.
  (setq y2 (cadr pt2))                                    ;Get the y coordinate of pt2.
      (princ (strcat "\ny2: " (rtos y2)))                 ;Print y of pt2.
  (setq hor1 (- x2 x1))                                   ;Get horizontal distance. "(- x2 x1)" subtracts x2 from x1.
  (setq ver1 (- y2 y1))                                   ;Get vertical distance. "(- y2 y1)" subtracts y2 from y1.
      (princ "\n Horizontal Distance: ")(princ hor1)      ;Print this to the console.
      (princ "\n Vertical Distance: ")(princ ver1)        ;Print this to the console.
      (print)                                             ;The use of (print) here is simply to add a new line in the console.
      ; Now we want to create a new list ("selectedRectangle") that will define the points to create four lines to make a box.
      ; The box is made up of a polyline.  This requires defining each point and sending that to the console
      ; as a command.  The first line is x1,y1 to x2,y1.  Then we just offer points around the box, returning to the beginning point.
  (setq selectedRectangle (list (list x1 y1) (list x2 y1) (list x2 y2) (list x1 y2) (list x1 y1)))  ; A list of points. Each point is a list (x y).
      ; Draw lines as defined by the "selectedRectangle" list of point coordinate lists.
  (command "_.pline"
          (foreach pt selectedRectangle                   ;Step through the list of point lists, using each point list one at at time.
            (princ (strcat "\nPoint: " (vl-princ-to-string pt))) ; Show me this value for "pt" in the console.
            (command pt))                                 ;Because _.pline is an interactive command, we have to use (command) to plug in our points.

  )
  (princ "\nThe rectangle was successfully drawn in the model.")
  (princ)                                                     ;Suppress echo. Clean exit.
)                                                             ;Close (defun C:workwithlists .
So, the four corners of the box are handed to the '_.pline' command looking like this:
((-322.5 308.5) (460.0 308.5) (460.0 -266.0) (-332.5 -266.0) (-332.5 308.5))
_.pline starts at (-332.5 308.5) and draws the line to each subsequent point until it gets back to the start.
You may wonder where the "z" coordinate is. Good eye! When the third value in the list is left out, the LISP interpreter assumes the value is '0'.
Don't Run Off
There is a ton of information in this little block of code. I've written in information on each function so you can get a clue about what they do. Copy this block out to a text editor so you can see it without having to scroll back and forth. Try to absorb it.
Microsoft's Visual Studio Code can be used as your editor if you like. AutoCAD 2021 and newer have VSCode plugins that interface AutoCAD with VSCode for debugging. It works great.
This info is available in a lot of places, but I don't always immediately understand what I'm reading. This is my interpretation of what I've gathered written the way I'd say it. Hopefully it makes sense to you.
Well, that's it! The first link is forged, and now I have a Thing That Works!
