A Gun Safe Has Two Jobs.
- Keep the gun out of the wrong hands.
- Release the gun into the right hands.
If it fails at either of these two jobs, the result can be serious.
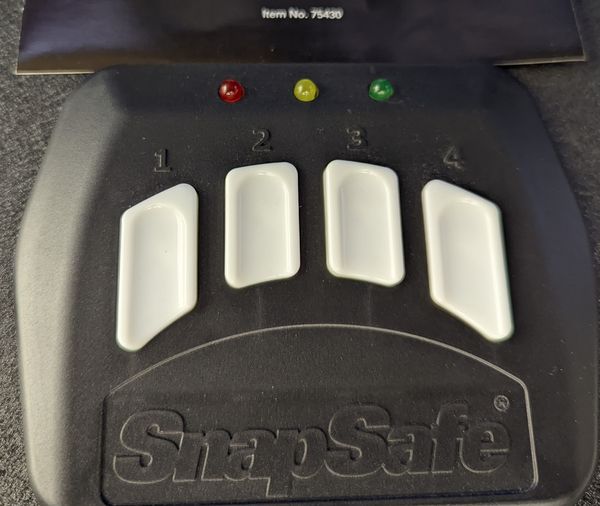
Introducing the SnapSafe Item No. 75430. It fails job number two. I purchased this at a local outdoors store about a year ago. It cost around $150.00.
It's pretty well built, and does a good job of keeping handguns out of the hands of those who don't have the correct combination. Unfortunately, it is horrible about giving those with the combination quick access to their weapon.
The SnapSafe works by a four-button keypad as seen here:

The SnapSafe's biggest problem is the under-powered, non-rechargable battery power design. The design uses a set of four AAA batteries to power the keypad and the small servo motor that unlocks the door. Our experience is those batteries only last a few weeks before they are too weak to run the motor. The keypad lights up and accepts your code, but the door doesn't open. I think you can see why that might be a problem. (Think home invasion at 2 AM.)
I wanted to give this safe a safer power supply. I had salvaged several Lithium Ion rechargable batteries from a couple of laptops I was retiring. One of them yielded some nice cylindrical 18650 cells which I have already used in a couple of projects.
The other laptop battery yielded six flat Lithium Ion Polymer batteries. I lost one to 'education' (I wanted to see what would happen if I drove a nail through it), leaving me with five. The nominal voltage of one of these was almost identical to the voltage provided by the four AAA Alkaline batteries.
My tests showed the flat LiPo battery powered the whole unit much better than the AAA's had. Now I just had to put it all together.
I had already ordered two Adafruit Item No. 4755 Universal USB / DC / Solar Lithium Ion/Polymer chargers which I had not used yet. Things seemed to be coming together nicely.
All I needed to do now was figure out how to get the battery and the charger mounted in the space allowed by the design of the safe. I also wanted to insure I had easy access to the plugs on the charger, so that it would not be a challenge to plug it in. My simple solution works just fine, and leaves all the room we need inside the safe.
I measured out the dimensions and holes on the metal tray and the charger circuit board. Then I whipped up this mounting plate in OpenSCAD, grabbed a few 2.5mm nylon standoffs, screws and nuts, and I was in business.
I drilled a 1/2" hole through the top back of the safe, passed the USB-C cable through, plugged it in and we were golden.
Here's the OpenSCAD code for the transition bracket:
// Metal plate mount screw holes 48mm apart
// 3mm screw hole diameter
// Charger has 4 holes, 2.5mm diameter
//  33mm x 28mm
// board is 33.1 x 38.4
//
// flat = ([38.4,33.1,2],true);
// crossbar = ([150,60,2],true);
//
$fn=80;

module 2holes(){
    translate([0,24,-2])
    cylinder(5,d=3.2,true);
    translate([0,-24,-2])
    cylinder(5,d=3.2,true);
}

module 4holes(){
    translate([16.5,14,-2])
    cylinder(5,d=2.8,true);
    translate([16.5,-14,-2])
    cylinder(5,d=2.8,true);
    translate([-16.5,14,-2])
    cylinder(5,d=2.8,true);
    translate([-16.5,-14,-2])
    cylinder(5,d=2.8,true);
}


difference(){
    union(){
        cube([38.4,33.1,2],true);
        cube([15,60,2],true);
    }
    union(){
    2holes();
    4holes();
    }
}
The safe works better now than it did when it was new. It's now powered from a USB wall wart, and when the power is out, the battery has plenty of backup power to sustain operation for days. I think this is a much-improved design.
Here are a few more items worth mentioning that make the project possible:
(I get nothing from you clicking, these are here as information only.)
JST-PH connectors from Amazon
The WONDERFUL Preciva crimper
Polyimide film tape
2.5mm Nylon standoff set
and of course the Prusa i3 Mk3s+
I'm really happy when I can use recycled parts coupled with my skills and gear to make something that doesn't work, work.
