Building Pelican
Documenting my journey to understanding the Pelican system.
This is intended to be a resource document for ordinary people interested in the Pelican static blog generator. It is a lot to read. It was a lot to write. My hope is that others may benefit from the effort.
Learning How to Build My Blog Using Pelican.
Contents:
-
An Overview of My System Remote Web Server The Local Pelican Install
-
An Overview of How Pelican Works Python and Jinja Templates Plugins
-
The Photos Plugin Where I'm Coming From Explaining What Confused Me
-
Solving Issues with Categories Symlinks fix path issues
-
Getting My Tagcloud to Work The undocumented steps
-
The Inline-Gallery Extra Images Mystery (Photos-Plugin) A Solution At Last!
1. An Overview of My System
The "system" I'm describing is made up of at least two physically separate computers: one owned by Digital Ocean (the Remote Web Server), and one owned by me (Brilliant, or the Local Pelican Install).
1a - Remote Web Server
This site (drgerg.com) runs on a DigitalOcean droplet. Nginx is the server engine.
The server only serves content. Creation of the content happens elsewhere; in my case, on a tiny utility computer in my office.
You have to have some way of getting your Pelican-generated content uploaded to your remote web server. There are multiple ways to do that. I use ssh to work with these machines. Setting up ssh access is a large topic all its own, and is not in the scope of this exercise. I'm thinking about working something up on that.
Pelican is not installed on the web server droplet.
1b - The Local Pelican Install
All the editing of docs happens here in my office on a little Lenovo i3 machine I call Brilliant. Brilliant runs Ubuntu.
The actual Pelican package is installed on here on Brilliant. I use the old method of simply installing things like Pelican system-wide rather than using venv or any sort of virtual machine. There are instructions on how to do installs in virtual environments here.
You will want to read over the pelican docs before starting to do the install. You will not come away from reading those with a sense of full comprehension, unless you are a career web developer, in which case you probably don't need to read this blog page.
However, reading through those few short pages will give you a foundation of knowledge upon which you can build the fuller understanding you will want in order to use Pelican.
The documentation for Pelican is found here.
Pelican on Github is found here.
Doing it my way, the command: sudo pip3 install "pelican[markdown]" places the Pelican installation in /usr/local/lib/python3.8/dist-packages/pelican/ on my editing machine, not the web server machine. That was major discovery as I tried to understand how the parts worked together to provide the desired result.
When I finish a post, I run a little bash script I created containing two lines: make html and one rsync line that uploads the new content to /var/www/drgerg.com/public_html/ on the remote web server. (Details in Process Overview)
2. An Overview of How Pelican Works
2a - Python and Jinja
There are two main components to Pelican. Python and Jinja.
You probably know what Python is (very popular programming language), but you may not know what Jinja is.
Jinja is a templating system that sits between the output of a Python program and the desired web page interface intended for the end-user.
I use a Python/Jinja partnership to run my bespoke home automation system. My Python code sends data to Jinja template files, which are HTML with special Jinja syntax in them. My local-network-only web server then serves up the Python output as filtered by Jinja templates.
The result looks like this:
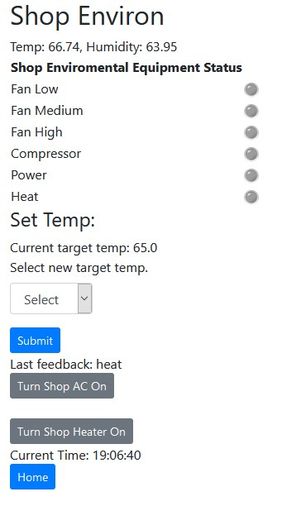
The same thing happens in Pelican.
The Jinja templates give Pelican its theming capabilities. The default theme for Pelican is notmyidea. All of the theme-specific files live in the /usr/local/lib/python3.8/dist-packages/pelican/themes/notmyidea/ folder. A theme can have its own .css file, as well as unique javascript files and will certainly have theme-specific Jinja templates. More on those in coming up in a bit. First let's look at the process overview.
Process Overview
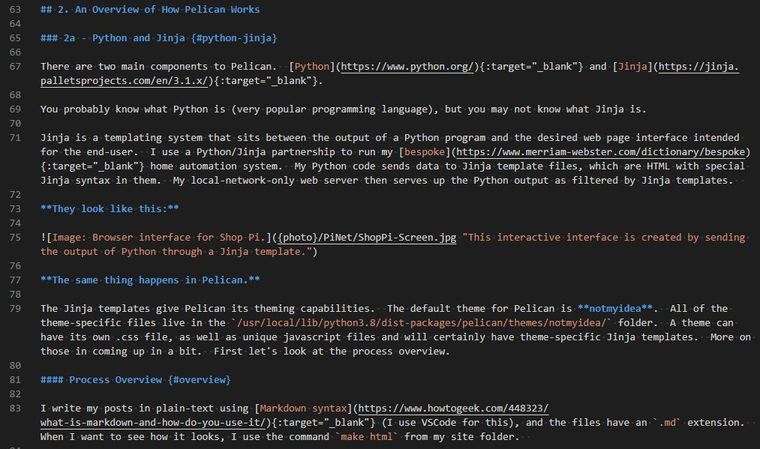
I write my posts in plain-text using Markdown syntax (I use VSCode for this), and the files have an .md extension.
This is what it looks like:
When I want to see how it looks, the make html command prepares the files, and an rsync command uploads them. Then I can see them using my browser. At this point they are live, so this process would NOT be be optimum for a commercial website. Just sayin'.
SideNote: There are other
make ????commands available, and you can learn more about those in the various docs, or by typingmake helpon the command line. If you're editing on a Windows system,makemay not be your best choice. Theinvokemethod might be best for you. I'm describing here the way I do things, but I do not claim my way is the best way for anyone else, only that my way works for me.
Now back to the overview.
When make html is executed, make runs and reads the content of the Makefile file in that folder. The Makefile is a configuration file telling make how to use Pelican to generate this site. The option (the second word) you use in your make command determines what Pelican does and what sort of output is generated. By using the command make html, I get a complete set of uploadable files to send to the web server. rsync handles the upload, and once that's done, the new data is live on the Internet.
Using the instructions generated by make html, Pelican processes each .md file and creates a .html file for each one. Pelican filters each .md file through the appropriate Jinja template and, in the end, the created .html files are ready to be uploaded to the webserver machine.
I created a shell script for uploading because the command to do it was too long to remember. I named it sendit.sh. It contains two lines and it looks like this:
make html
rsync -avP --chown=www-data:www-data -e 'ssh -p #####' ./output/* user@domain.com:/var/www/domain.com/public_html
Of course, there's an actual port number in place of the #####, and an actual username and domain name where you see user and domain. Once this finishes, the new content is immediately available through a browser.
2b - Templates
As you read various things on the web about Pelican, you'll read a lot about themes, but will rarely see anything about templates. The Jinja-based theme templates are the power behind Pelican themes.
The initial install of Pelican comes with two themes. You can see those, and where they are installed, by running this command:
greg@brilliant:~/drgergsite$ pelican-themes -lv
. . . which on my install returns:
/usr/local/lib/python3.8/dist-packages/pelican/themes/simple
/usr/local/lib/python3.8/dist-packages/pelican/themes/notmyidea
There are two important folders living in the /usr/local/lib/python3.8/dist-packages/pelican/themes/notmyidea/ folder on my local editing machine. They are templates and static.
The templates folder contains, you guessed it, Jinja templates. We'll come back to that later when we look at the Photos Plugin.
The static folder contains css, fonts, images, and js folders. These folders in the static folder are where you will place any stylesheets or javascript files that your site depends on. The required files get added to the upload list, and when we run rsync (sendit.sh), they are uploaded to the web server.
Out of the box, a Pelican blog using the notmyidea theme uses no javascript. I wanted to have popup photo galleries, though, and that almost definitely meant some form of javascript would be required.
If you play around with your themes at all, you will want to know where the static/css and static/js folders are.
And remember, these folders live on your editing machine and the files are sent up to the web server as needed.
2c - Plug-ins
I only use one plugin as of this writing: the Photos Plugin. Once correctly configured, it works great. But figuring out HOW to get it correctly configured was quite a challenge for me.
3. The Photos Plugin
Disclaimers: Writing good code takes skill. Writing good documentation for good code takes a lot of time and a different set of skills. Finding all that in one person is pretty rare.
This is not a criticism of the Photos plugin team, nor is it a criticism of the README.md provided on Github.
I did get the Photos plugin to work, and it works great. Here's an example at the bottom of this post.
3a - Where I'm Coming From
I've never been a professional anything in the computer world. Well, maybe I'm a professional computer user, but my degrees are not in a computer-related field, and I do not work in hardware or software development.
In the 80's I wrote DOS batch files. In the 90's I started writing some HTML. When I found out about .css stylesheets, I dabbled a bit in those. When WordPress started taking off, I jumped onboard and rode that train a while.
I wrote my first Python program in 2015 after finishing a Codecademy course. I will admit to having written three Python/Tkinter applications for Windows that I use in my real job, so if "get paid for it" makes you a professional, then I guess?
I still learn new stuff every day, and getting Pelican to work with the Photos plugin stretched me. That's why I'm writing this. Maybe someone else can benefit from the expression of these thoughts.
3b - Explaining What Confused Me
I read README.md on Github. I had questions after the first sentence. There appeared to be three use-cases in that sentence: add a photo, add a gallery, add a photo to body text, but I could only find examples of two. I moved on.
The installation went smoothly. No issues there.
The Usage section required me to make assumptions. I did not know for certain if the listed configuration options were supposed to be added by me into pelicanconf.py or not. Maybe they went in publishconf.py. I dug around a bit on Github, and eventually ran across the examples folder. In it was an edited copy of pelicanconf.py that had some good hints inside. Learned Thing #1.
I provided the correct absolute path to my pictures folder.I set PHOTO_INLINE_GALLERY_ENABLED = TrueI kept the default PHOTO_INLINE_GALLERY_TEMPLATE = "inline_gallery"
The How to use section gave me another stumble. The phrase, "add the metadata field gallery: {photo}folder to an article" did not register with me. "Metadata field"? I guessed it probably meant the first few lines at the top of the article text. Mine were all sentence case (first caps), but the example was all lower case. Would it work? I guessed. It worked. Learned Thing #2.
". . . which can be used with Lightbox . . . " What the heck is Lightbox? Do I need it? Do I want it? How would I know?
Scanning and scrolling past the Exif, Captions and Blacklists section, I get to How to change the Jinja templates.
Full stop.
OK. Tuples with data, I get that. But where the heck is the template article.html? At this point, I had no clue. Much later I would discover the pelican-themes -lv command (discussed here).
OK. Three examples:
1. associated image before article. No.
2. add gallery as the end of the article. No.
3. display the thumbnail with a link to the article. No.
I want to put my gallery in the body of the article, and then I want the usual 'previous' and 'next' arrows and such. How do I get that? Does that have a name? What is it called? I don't know.
Now here's the How to make the gallery lightbox section. There's that term again: lightbox. Is that what I'm looking for? So now do I need to install Magnific Popup? Is Magnific Popup a "lightbox"? This looks pretty complicated. Let's not.
So how then, do I get a gallery in my article? I put the pictures in a subfolder, put the Metadata Field in the header of my article but nothing shows up.
I go back to the Photos Plugin repository root, and there I find the examples folder. Buried in content/articles I find article-with-inline-gallery.md which yields up a tidbit of useful information: put gallery followed by two colons, followed by {photo} then the gallery path. Just like the 'metadata' in the article header, but with two colons instead of only one.
I put that line in my article (adjusted to the proper parameters, of course). I do not get a gallery. Why? Well let's think about this. In pelicanconf.py we have a line that talks about PHOTO_INLINE_GALLERY_TEMPLATE = inline_gallery. Where is that template? So, back to the examples folder. Way down in themes/notmyidea_photos/templates/ I find the Holy Grail: inline_gallery.html.
OK. That implies I need to have this template in my templates, but where the heck are they? I still don't know. After about an hour Googling I finally find a reference to the pelican-themes -lv command. Learned Thing #3.
Now that I know where to look, I navigate to the templates folder on Brilliant. There is no inline_gallery.html. What the heck? I guess I have to create this myself, which I do using the provided code for that file.
Now I get a gallery! I click on a thumbnail, and it opens, but there are no navigation pointers. Progress, but not home.
Now that I know where the templates are, I feel empowered to make some changes. I try adding bootstrap.css to .../static/css and using the code in the example for bootstrap, but it doesn't work. I'm guessing it's because I'm not using a Bootstrap theme, but I'm not sure.
I go back and start reading up on Magnific Popup because apparently I need something like that to get what I'm looking for.
It quickly becomes obvious to me that I need jquery. I don't know tons about jquery, but I know it has to do with javascript, and I know javascript is related to a package called node, so I sudo apt install nodejs followed by sudo apt install npm (which is the Node Package Manager).
Somewhere I saw I would need two packages: @popperjs/core@^2.10.2 and jquery, so I move to the root of my /themes/notmyidea folder, and install them:
sudo npm install @popperjs/core@^2.10.2
sudo npm install jquery
This creates a node_modules folder in themes/notmyidea and inside that folder are what I'm looking for.
Standing in my .../themes/notmyidea folder, I copy jquery to .../notmyidea/static/js:
sudo cp -a node_modules/jquery/dist/jquery.min.js static/js/
Now it's back to digging into the Magnific Popup docs, including random Google results.
It looks to me like all I need in order to use Magnific Popup is the .css file and the .js file. So I go to their Github repo and snag jquery.magnific-popup.js and magnific-popup.css which I drop into my respective .../static/js/ and .../static/css/ folders.
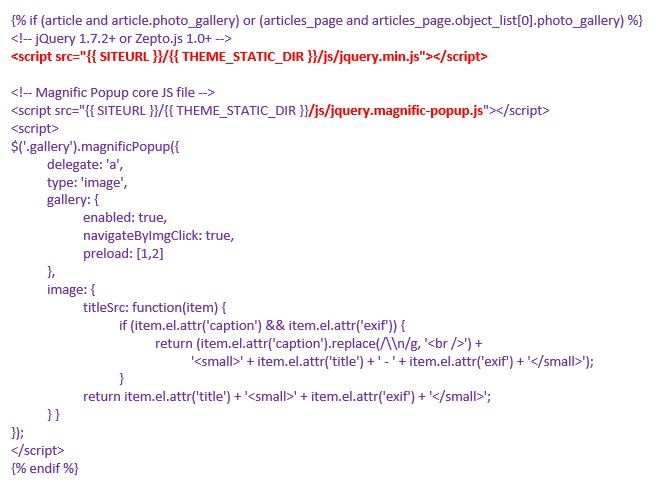
Then I make two edits to .../notmyidea/templates/base.html as specified with minor tweaks (in red). I haven't figured out if it's possible to post the actual code here, so I'm posting these two screenshots. You can get the code out of the Photos plugin README.md on Github.
First, in the header of base.html I copy/pasted this code:

Then in the body of base.html I copy/pasted this code just before the </body> tag. (slight tweak in red)
Up to this point, all of the work has been on Brilliant, the Local Pelican Install machine. I thought I needed to have the javascript stuff on the web server machine too. Made sense to my brain, anyway. I later found out that Pelican knows what needs to be on the server machine, and it queues it up to be uploaded.
3a Solving Issues with Categories
I was experiencing issues with the Categories links. If you clicked the Categories link in the top bar from an article or the front page, it worked. If you clicked it from within the article you selected from the Categories page, the link failed.
The problem was with the path. The first scenario give you this: "https://www.drgerg.com/categories.html".
In the second scenario, the /category/ folder is part of the path: "https://www.drgerg.com/category/categories.html".
My solution was to create symbolic links on the web server to point the server back to the right .html file.
- Log in to the Remote Server machine.
- Navigate to the categories folder buried down in /var/www . . .
- Do the same thing in the /pages/ folder.
sudo ln -s ../categories.html categories.html
When I got the tagcloud working, I immediately noticed the same issue. So I applied the same solution.
sudo ln -s ../tagcloud.html tagcloud.html
This may be a kludge, but it works.
4a Getting My Tagcloud to Work
If there is one frustration I experience with Pelican plug-ins it's the docs. It is a common failing with FOSS in general and it's a huge problem. I am a huge fan of FOSS. This post is my way of helping.
Here's what I had to do to get the Tag-cloud plugin to work. - Install the plugin. - Put the settings mentioned here into pelicanconf.py. - Edit main.css in the /usr/local/lib/python3.10/dist-packages/pelican/themes/notmyidea/static/css/ folder (your path may be different) adding this:
/*************************************/
/* Tag Cloud - added Nov. 22 by greg */
/*************************************/

ul.tagcloud {
    list-style: none;
    padding: 0;
}

ul.tagcloud li {
    display: inline-block;
}

li.tag-1 {
    font-size: 180%;
}

li.tag-2 {
    font-size: 140%;
}

li.tag-3 {
    font-size: 100%;
}

li.tag-4 {
    font-size: 60%;
}

ul.tagcloud .list-group-item span.badge {
    background-color: grey;
    color: white;
- Create a 'tagcloud.html' template file in the /usr/local/lib/python3.10/dist-packages/pelican/themes/notmyidea/templates folder. Drop this in there:
{% extends "base.html" %}
{% block title %}{{ SITENAME }} - Tags{% endblock %}
{% block content %}
<section id="content" class="body">
    <h1>Tags for {{ SITENAME }}</h1>
<ul class="tagcloud">
    {% for tag in tag_cloud %}
        <li class="tag-{{ tag.1 }}">
            <a href="{{ SITEURL }}/{{ tag.0.url }}">
            {{ tag.0 }}
                {% if TAG_CLOUD_BADGE %}
                    <span class="badge">{{ tag.2 }}</span>
                {% endif %}
            </a>
        </li>
    {% endfor %}
</ul>
</section>
{% endblock %}
- Add these lines to pelicanconf.py:
DIRECT_TEMPLATES = ['index','authors','categories','tagcloud','archives']MENUITEMS=(('Categories','categories.html'),('Tags','tagcloud.html'))RELATIVE_URLS = FalseTAG_CLOUD_STEPS = 4TAG_CLOUD_MAX_ITEMS = 100TAG_CLOUD_SORTING = "alphabetically"TAG_CLOUD_BADGE = False
I'm pretty sure that's all the steps I took to get tagcloud working.
So that's the end of my circuitous wanderings to get things working on my Pelican blog. It's all good. Nothing is wasted unless we waste it intentionally.
Maybe there are good hints in all that verbiage that will help someone else out.

